 Environment


|
| Environment | | Menus |
The title bar displays the name of the application, the default database (if any) and, if concurrent database access is being used, the name of the controlling master process.
The menu (and subsequent sub-menus and dialogs) is the main way of interacting with SIR/XS. (Note. These menus and dialogs are all written in VisualPQL and the source of all programs is included on the system procedure file and can be altered or replaced by custom built menus.)
Select a choice from any menu with the arrow keys, with a mouse or other pointing device or with underlined "hot keys" (use Alt-letter in the standard way) or by any indicated control key. Some of the frequently used items can also be activated from the toolbar.
Return to a previous menu by pressing Esc.
Menu items may pull down further menus (indicated with a small arrow), may display a dialog that you fill in or may take an immediate action. Some actions may generate output in the Main Output Window. This is a scrollable area (up/down/left/right) that holds remarks, messages and screen listings. The amount of remarks, commands and other internally generated messages can be controlled through session options. You can select and cut from the main output window and can print it, save it or clear it. If your session produces more output than it can hold, earliest lines are discarded.
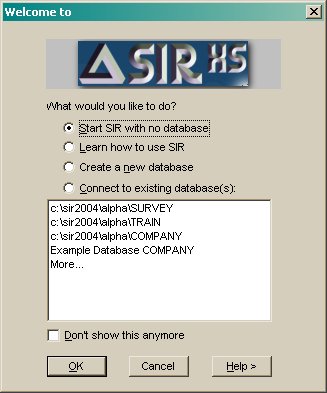
When you start SIR/XS, you may get a 'Welcome to SIR/XS' dialog asking what you want to do. This allows you to create a new database or to connect to an existing database. Press Close to use SIR/XS without a database. Check "Don't show me this again" to suppress this. It can be set to display again in the preferences dialog.
The File menu contains commands and utilities for working with the output window and overall session.
| |
The database directory specifies where the database files are created (defaults to your current directory). Ensure any specification includes a terminating delimiter e.g. a backslash '\' on Windows. You must have write access to this directory. The database filenames are the database name with extensions .srn where n is 1 to 6. Check Journaling to keep a record of changes made to the database and data that can be used to recreate a database if necessary.
A database can have a case structure where each record on the database belongs to an entity and is usually processed as part of this entity. For example, a personnel database might contain various record types (basic data, positions held, reviews, etc.) where all records relate to a single employee with an employee identification that can be used as the case id. If the database is Case structured, select the data type from 1, 2 or 4 byte integers or string. One byte holds values up to 123, two bytes up to 32763 and four bytes over 2 billion. Assign the case id a valid SIR name. Cases are normally held in ascending sequence. Uncheck Ascending to store data in descending sequence.
See also the DBMS CREATE DATABASE command.
| |
If a database password exists you must enter it to attach to the database (Passwords are not case sensitive).
Enter a Read Security and Write Security password. If you do not enter any passwords and there are no security passwords defined, then you have full access to the database. If there are passwords defined, then the access you have is restricted to the level matching the passwords you specify.
If you browsed for the database, the directory is filled in automatically. When specifying a directory, ensure any specification includes a terminating delimiter e.g. a backslash '\' on Windows.
See also the DBMS CONNECT DATABASE command.
If other file types are selected and further information is needed to open that file then an appropriate dialog is displayed.
| |
| |
| |
| |
| |
| |
| |
TipIf this command is chosen when the cursor is at the end of a line of text in the output window then that line is taken as a command and executed without opening the DBMS command dialog. |
TipThe default main menus program allows you to enter the name of a menu command in the output window. For example, if you typeMEMBERS[ctrl+R] then the Members dialog is displayed. |
The DBMS Command dialog allows entry of DBMS commands in the top text area. Once a command is entered it can be run using the Execute button or cleared using the corresponding Clear button.
A LIST of previous commands is at the bottom. This list also includes some commands generated by the other menu commands. These commands can be selected and appended to the current command or cleared.
You can change the size of this dialog in preferences.
| |
| |
The dialog lists all record types in the selected database or tabfile and allows you to select one. By default all variables are displayed or you can select individual variables. By default the spreadsheet is enabled to allow updates to the records providing that all key fields are selected. Uncheck update to disable this. By default, the values of variables are displayed. If you want value labels displayed, check the value labels box; this disables updating.
Enter a Boolean condition to select a subset of records. You may apply conditions based on variables in the record or in the Case information record (CIR).
The SIR/XS spreadsheet can also be invoked by the SIR SPREADSHEET command and can be invoked as the SPREAD SHEET VisualPQL Procedure.
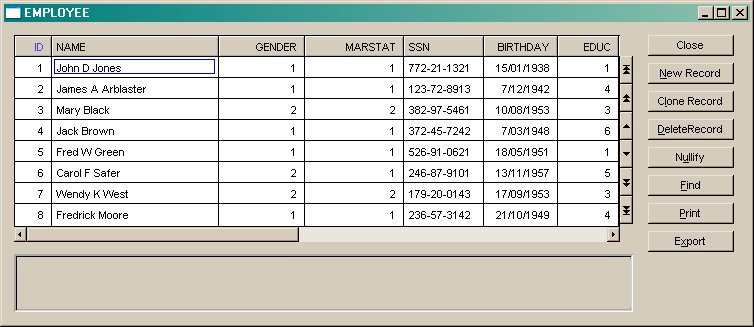
There are eight action buttons available as follows:
| |
Check the PQLForms box to create or run PQLforms.
Choose Default and press ok to create and execute a form definition for the current database.
Choose Source File, and enter the name of a Text Form definition file.
Use the "[>>]" button to find a file using the operating system file browser.
If you are using SIRForms then you can also enter the name of a file to store a precompiled version of this form.
Press Create... to create a default source file with select record types.
Choose Precompiled and enter the name of a Compiled SIRForm definition file.
Use the "[>>]" button to find a file using the operating system file browser.
If a non default form is chosen then execution parameters such as
DB=dbname PREFIX=path etc may also be entered (See SirForms).
Check Master and enter the name[:port] of a master process to start the form in concurrent update mode.
Check Make this the default data entry for this database to save this as the method used by the Data Entry... menu item.
WRITE SCHEMA
or it will call the default entry procedure set in the forms dialog above.| |

The output file is suitable for input to the File Input utilities. You must have DBA level access to use this utility.
Enter a filename to contain the dumped data. Use the "[>>]" button to find a file using the file browser.
Check the CSV option to dump the data in Comma Separated Values format.
Enter an optional Undefined Character to be written to the file when undefined data are found. The default undefined character is BLANK.
If the I/O formatted variables option is selected then the format is as defined in the data dictionary. If the I/O formatted variables option is not selected then any variables without file formatting defined in the schema are written to the end of each line.
Check the Explicit Decimal Points box and real variables with decimal parts will be written with their decimal points. The default is that the decimal point character is not written but implied by the default number of decimal places defined in the schema for that variable. (eg an F4 with a value of 3.1415936 will be dumped as 31416 and input as 3.1416).
Press Select Cases to define a subset of case data for the output.
Press Select Records to define a subset of record data for the output.
See also the DBMS FILE DUMP command.
| |
Enter an optional Boolean condition based on variables in a record and then select the record type from the list. You do not need to enclose the condition in brackets.
Use the pull down choice to change the order that the record types are displayed in the dialog's record menu.
Press > to add your selection to the Selected Records list.
Press < to remove an item from the Selected Records list.
Press OK to save the selection.
| |
Enter an optional Boolean condition based on variables in the CIR. You do not need to enclose the condition in brackets.
1,2,4,8 thru 10,15).
5,3,2).
.5,18543545)
Press OK to check the syntax of the Boolean and list then save the settings.
| |
Use the pull down choice to change the order that the record types are displayed in the dialog's record menu.
Press > to add your selection to the Selected Records list.
Press < to remove an item from the Selected Records list.
Press >> to add all records to the Selected Records list.
Press << to remove all items from the Selected Records list.
Press OK to save the settings.
| |
Choose the type of data updating required from the list:
Choose the database to update.
See batch data input.
| |
You must have DBA level access to use this utility.
You can select record types and variables to display and also take a subset of the data.
Check Include CIR to display data in the Common Information Record.
Check Sort By Variable Name to list the data for each record in alphabetical
order of variable name. The default is the data dictionary order.
Press Select Cases to define a subset of case data for the output.
Press Select Records to define a subset of record data for the output.
Press Select Variables to define variables to include in the output
See the FILE LIST command.
| |
Use the pull down choices to change the order that the record types and variable names are displayed in the dialog's menus.
Press > to add your selection to the Selected Records list.
Press < to remove an item from the Selected Records list.
| |
The Output can be a report or tabulation, a graph or a file readable by another software package.
The procedures can be saved as either a set of selected options for the dialogs or as a PQL program. You can edit the saved PQL to perform more complex operations than can be specified in the dialog interface.
The More Procedures selection in this menu is a place where you can store commonly run reports and other programs. These programs appear by name in a list and you can add new programs and descriptions. The most recently executed program from the procedures above can be stored in the More Procedures list, as can external programs in files or members.
The Preferences selection will open the main preferences dialog on the Procedures page.
The Export, Report, Tabulate, Graph and Statistics options in this menu all initiate a set of dialogs that allow you to select an output file, database and local variables, sort, filters and layout options for the generated output. These dialogs are described below.
Note: If you have selected variables from more than one record type and there is not a one to one relationship between those records then you may need to specify a path from one record type to the other. A dialog is displayed to specify this path.
Change the record processing sequence and paths using the up/down arrows and the via... button.
In the 'Via' dialog, choose the variables from previous records to use as the key fields for this record.
Press Sort > to add the selected column to the list of Sort Variables.
Press A/D to toggle the sort order of the selected variable (Ascending or Descending).
Press ^ to move the selected variable up the list.
Press v to move the selected variable down the list.
Press Del to remove the selected variable from the sort variables.
Specify a logical Condition that records must satisfy to be used.
Use the buttons to create a logical expression.
| |
PROCEDURE family belonging to the current database. There are also some SYSTEM procedures that will run on any database.A user can add a USER procedure by pressing the Add button then entering information about the new procedure and selecting the procedure's program source. If you have run one of the other procedures in the main menu (eg Report... Tabulate... Export...) in this session then you can also save its source as a stored procedure.
The program source along with the entered information is then copied to the procedure family.
If you uncheck the Copy Source button then the stored procedure will simply CALL the external source code. This way you can put the procedure into several databases but only maintain one copy of the program.
Pressing the Run button will execute the selected procedure. What happens after you press run depends on the stored program.
| |
The variable selection section can be loaded without loading all the procedure options so that a report, say, can be produced on the same set of data used in another procedure type.
| |
Program Members are stored in the Procedure File. Members may be VisualPQL programs, sets of commands or other components of an application.
The dialog displays a list of the families in the current procedure file and allows you to select a family. The most recently referenced family is set when the dialog is displayed. There are several family operations:
There are several other options:
PWRITE and store the members from that file. This gives options of notification and for permissions to overwrite existing members of the same name.
Most members relate to a specific database and are saved in the procedure file that belongs to that database. Normally the procedure file you are working with is the procedure file of the default database. However, you can select another procedure files to work with.
SYSPROC and the external name SirProc.srp.
Users may need to execute or run procedures stored as members, but not be allowed to see or modify those procedures. Give a member a password and then make it public to do this. Public members may be executed but not seen or modified unless proper passwords are provided. Make members public with the Public option on the dialog.
| |
There are four current types of members. The member type is identified by a suffix delimited from the name with a colon (:). The current member types are:
Text :T
RUN, and both a :T or :E version exist, the system determines which to run based on dates and times of last update.
Executables :E
Object Code :O
External Variables:V
| |
Check the Text box and enter text to search for within the selected members.
The search can be Case sensitive and the text must match exactly. The search can be limited to whole words, for example the string "EXAM" is not found in "This is an example" if the Whole Words box is checked.
You can limit the number of lines that are read in each member. If you wanted to find all members that included the word "GENERATED"
on the first line then enter "1" in the Lines box. If this is blank then all lines are searched.
Use the Created, Modified and Byte Size fields to search for members with these attributes.
Press the Search button to start searching. If members are found matching the search criteria then a dialog is displayed:
| |
Select Truncate , wrap , or page to specify how long lines are printed. Truncate does not print any text that does not fit on the printed line; wrap prints text on the next line; page prints another page (or pages) with the long text.
You can optionally save the formatted output to a named file.
| |
Type in the name of the input file.
Use the "[>>]" button to find a file using the operating system file browser.
Check NoInform to suppress remarks in the output window;
Check Replace to replace existing Members;
Check Public to allow password protected Members to be Run without prompting for passwords;
Check Confirm to prompt for confirmation before replacing a Member;
Check Report to produce a summary report at the end of the process.
See the PREAD command.
| |
Type in the name of a file to contain the Member(s).
Leave the filename blank and the information is written to the output window.
Use the "[>>]" button to find a file using the operating system file browser.
Check NoInform to suppress remarks in the output window.
See the PWRITE command.
| |
Type the member Name, that can include a family name (FAMILY.MEMBER).
Type an optional Password for this member.
Check Public to allow this member to be executed without a password.
| |
| |
Selected members can be copied from one procedure file to another or from a PWRITE file to a procedure file.
Select two procedure files or a procedure file and a PWRITE (export version of a procedure file);
Select type of members to compare (Text, or compiled executables).
Check the size, date or contents boxes to compare these attributes. If none of these are checked then members that do not exist in the one of the files are selected. Size selects members that differ by size; Date selects members that differ on modification date; Contents selects members if they differ by size or, if they are the same size, then the text is compared and the member is selected if different.
Press Compare to start comparison process.
After comparison the different members selected are in each list. Use the < or > buttons to copy selected members from one side to the other.
| |
| |
| |
Use the create button to generate a default form from the current default database.
| |
| |
Select a connected database and press Default to set that database as the default.
Select a connected database and press Disconnect to disconnect that database.
Press Connect... to get the Open Database dialog.
Press Properties... to display some information about the selected database.
Press New... to create a new database.
Press Close to close the dialog.
The other buttons in this dialog are for convenience. These functions are also available from the database menu.
| |
An Export can be used to transfer a database from one operating system to another.
An Export file can be used as the input to the Import dialog, or simply run as a text file containing SIR/XS commands.
Enter a Filename to contain the Export.
Use the "[>>]" button to find a file using the operating system file browser.
Optionally specify a New Database name and New Password for the exported database. The default is that of the
current database.
Options
Press Case Filter to define a subset of case data for the output.
Press Records to define a subset of record data for the output.
See also the DBMS EXPORT command.
NoteThere is noIMPORT command as such. The export file is a set of commands that, when run, rebuilds the database. An export file can be run like any file with SIR/XS commands. |
| |
You must have DBA level access to the database.
The output file can be used to create a new database. A unload file can be used as input to the Reload dialog.
Enter a Filename to contain the Subset.
Use the "[>>]" button to find a file using the operating system file browser.
Optionally specify a New Database name and New Password for the exported database. The default is that of the
current database.
Check Delete Journal to remove the database journal file.
To unload a subset of the database, select cases and records using the following buttons:
Case Filter to define a subset of case data for the unload.
Records to define record types used in the unload.
See the SUBSET command.
See the UNLOAD command.
| |
You must have DBA level access to the database.
The output file can be applied to a mirror copy of this database using the Journal
Download dialog. This file is transportable across operating systems.
Enter a Filename to contain the Upload.
Use the "[>>]" button to find a file using the operating system file browser.
Enter the name of the Journal to upload. The default is the current database journal file.
Enter the database Update Levels to limit the upload. The default is the most recent update level.
Leave the first level blank to start from the first update in the journal. Leave the last blank to get all updates to the end of the
journal.
Enter an optional Title for the upload. This title is ignored by the download procedure.
Press Select Variables to define the records and variable updates to upload.
See the UPLOAD command.
| |
You must have DBA level access to the database.
The current database could be a reload of an earlier version of your database for which you have
subsequent updates stored on a database journal file (JOURNAL RESTORE), or you can restore the database to
and earlier update level by undoing the journalled changes (JOURNAL ROLLBACK).
Note that changes to the schema cannot be undone. It is possible to rollback data changes from before
some schema changes but this should be done with caution.
Use the "[>>]" button to find a Journal File using the operating system file browser.
Check Rollback and select an earlier update level to restore the database to;
Or check Restore and select a later update level to restore the database to;
If there are no appropriate journalled updates then the relevant option will be disabled.
See the JOURNAL RESTORE command.
| |
Enter the name of the Upload File to apply.
Use the "[>>]" button to find a file using the operating system file browser.
Check Messages if you wish to view any informative messages as the download is applied.
DOWNLOAD command.
| |
The Options can only be used by the Database Administrator (DBA).
4,2,5 checks cases 5,7,9 & 11)
See the VERIFY command.
| |
See the ITEMIZE command.
| |
Use the "[>>]" button to find a file using the operating system file browser.
There may be more than one copy of the database in an unload file. By default the last (most recent) unload of a database is reloaded. Press Itemize to see if there is more than one unload on the file, if there are then you can change the File Number to select the update level to reload.
Enter a Database Directory where the database is to be created. If a database with the same name already exists here then the RELOAD fails.
Uncheck the most recent database copy box to select an earlier copy of the database if one exists on the file. You can use the Itemize button to view details of the unload file.
Optionally enter new values for N OF CASES and
RECS PER CASE in the new database. These default to that of the original database.
Check the Reset Update Level box to set the update level of the created database to one. The default is the update level of the unloaded database.
Enter a Loading factor between 0 and 99 (the default is 99).
See the RELOAD command.
See the ITEMIZE command.
| |
Enter a Loading factor between 0 and 99 (the default is 99).
See IMPORT.
| |
You must have DBA level access to the database.
Check Delete Journal to delete the current database journal.
Check Delete Procfile to delete the current database procedure file.
See the PURGE command.
| |

Press Security to modify database access security settings.
Press Common to update the list of database common variables.
Press Temporary to update the list of temporary variables.
See overall commands.
| |
Database security is controlled by up to 31 levels of read and write access.
Specifying a read and write password associated with a particular level, at database connection time means you have that level of access to the database.
The Database Administrator (DBA) must have the highest level access (Read 30 / Write 30).
System Level is the minimum Read level of access required to use the UNLOAD FILE Utility. The default is 30.
Common Read Level is the DEFAULT level of access required to read data stored in Common Variables. The default is 0.
Common Write Level is the DEFAULT level of access required to update data stored in Common Variables. The default is 0.
The current read and write passwords are listed.
To define new passwords and associate them with access levels
Type the Level (0 to 30), the new Password and press the Read or
Write button. To remove an existing password, type the level and leave the
password blank.
| |
A list of the current Common Variables is displayed using the standard record schema dialog.
Note that many options on this dialog do not apply to common variables or the CIR and have been disabled.
You can enter a new common variable and press Add, or Delete existing variables. You can also modify the variables labels, ranges and other meta data using the Detail... button.
Press OK or Apply to update the common variable definition. Press Save As... to save the common variable definition commands to a file without applying the changes to the schema.
See the COMMON VARS command.
| |
The computations are defined in the record schema definition and the values of these variables are not stored in the database.
A list of the currently defined Temporary Variable is displayed.
Type a new Name and press the Add button to define a new Temporary Variable.
See the TEMP VARS command.
| |
Type in a Key made up of the Case Id and optionally a record type and part of a record key. For a caseless database, just enter a record type and part of a record key. Enter a filename and press Add/Modify. Any records with keys after the entered one will be stored in that file. If the key is blank then any records before the first entered key. If data files are specified then there must be exactly one blank key.
Press Edit to copy a selected existing data file definition to the text areas below for editing.
Press Delete to remove a data file definition.
Press OK exit and save the data file definitions. Note: the data files are not applied until the database is rebuilt by unload/reload or export/import
| |

You can save record schema commands to a file using the Write... button.
| |
Check LOCK to specify that, if the schema modification requires it, that this record type may be locked after the changes are made. The database must then be restructured using unload/reload before the data in the record is accessible. If lock is not requested and the modifications require the record be locked then an error message is displayed and the modifications are not applied.
Enter the R/W Security levels for accessing data in this record. Specify one or two numbers from zero to thirty separated by a blank or slash. If one number is specified then this is both the Read and Write security level required to access this record data.
The Max Rec Count limits the number of records of this type in one case. If there
are no key fields defined then this number must be 1.
Max Input Cols is an overall database setting that can be
increased if required.
Lines/Rec sets the number of lines for multi lined input/output files.
To add a new record variable to the record definition, type in the
name at the New: prompt and press Add.
New variables are inserted after the currently selected variable in the list.
You can also add variables and copy their meta data from other variables using the Fetch... button. If you enter a new name and press Fetch then that new name is used, otherwise the variable name is copied from the chosen variable.
Select a variable from another record definition and press OK.
Select items from the data list and press Auto Number to assign non-overlapping column numbers to the selected items.
De-Number removes column numbers from the selected items.
Move Up and Move Down change the order in which the variables are defined.
Remove and Insert can be used to cut and paste items from one place in the list to another.
Sort changes the order of definition to match the input column order.
Change the I/O position of a single item by selecting it, changing the details at the bottom and pressing the Change button.
See record commands.
Press OK to apply the changes and exit.
Press Apply to apply the changes and not exit.
Press Save As to save the changed definition to a file. This saved file can be restored
and the record definition continued.
| |
The name of the current Variable is displayed.
Enter the R / W Security level to access this variable data (e.g. 20,30).
Enter a Scale Factor if this variable is a scaled integer.
Numeric variables can have a Statistical Type.
Gender, Type, Department).
Salary, Age, Duration).
BLANK can be used.
Press Import Value Labels to get labels from a file or the clipboard.
Press Previous to save any changes to this variable and
get the definition from the previous record variable.
Press Next to save any changes to this variable and
get the definition from the next record variable. You can also use the Find... button to search for a variable.
| |

The file or copied text should be either in comma separated value (CSV) format or lines containing values a labels. For example:
value. label
(value) 'label'
"value" "label"
...
You can either select a file with a predefined set of labels, create a new file and enter values and labels using a text editor then press Import From File; or copy labels from an external document and press Paste from Clipboard.
Use the Overwrite, Keep or Delete radio buttons to specify what happens to existing labels on this variable:
| |
Select a secondary index from the list and press Modify, or press New to create a new index.
Check the Unique box to create an index that points to a single record (e.g. Social Security Number on the Employee record). This ensures that no two records are added with the same value for the indexed variable(s).
Select a record and variable(s) to index on. Use the Key > button to add the variable to the key list.
Once a variable is in the key list:
use the A/D button to toggle the sort order;
Use the UPPER button to indicate that string keys are treated as case insensitive (converted to uppercase);
Use the v and ^ buttons to change the hierarchy of the keys;
| |
Use the >> to display a list of available ODBC data sources. This procedure uses the odbc.ini file and the windows registry to search for data source names. If this process shows windows security errors then the registry query can be disabled using the help menu on that dialog.
Press Next > and SIR/XS attempts to connect to the data source. If it fails an error message is displayed.
Press Next > and you are prompted to save a data update program. This program can be run at any time to read the data source into the defined record type without needing to go through these steps again.
If this is a new record type it is created. There is a possibility that the creation of the record type may require a database restructure. If this is the case, unload and reload the database and then run the data update program that you saved above.
| |
Choose Commands to produce a copy of the schema definition.
Choose PQLForm Code to produce a default data input PQLForm definition. This can be used to input data into the database.
Choose SIRForm Code to produce a default data input form definition. This can be used with SirForms to input data into the database.
Choose Report to produce a report documenting the structure of the database.
Enter a Filename for the output. If no filename is entered then the output is displayed
in the main window.
Use the "[>>]" button to find a file using the operating system file browser.
MISSING VALUES NAME to CURRPOS (BLANK)/.
Press Database Help to view details on the structure of the current database, records and variables.
See the WRITE SCHEMA and
SIR SCHEMA LIST commands.
| |
See the LIST STATS command.
| |
Press Recent > to display a pick list of recently connected tabfiles.
Press Connect... to browse the file system for tabfile files.
Press New... to create a new tabfile.
Press Delete to delete the tabfile.
Press Details to show tabfile information.
Select a connected tabfile and press Default to set that tabfile as the default.
Select a connected tabfile and press Disconnect to disconnect that tabfile.
Press Close to close the dialog.
| |
Tables can be added with the New... button or viewed with the Details... button.
.
| |
Press the Indexes button to view and modify the indexes on the table.
Select a secondary index from the list or press New to create a new index.
The index must have a valid SIR/XS name and this name must be unique to this tabfile.
Check the Unique box to create an index that points to a single row (e.g. Social Security Number on the Employee table). This ensures that no two rows are added with the same value for the indexed variable(s).
Select the variable(s) to index on. Use the Key > button to add the variable to the key list.
Once a variable is in the key list:
use the A/D button to toggle the sort order;
Use the UPPER button to indicate that string keys are treated as case insensitive (converted to uppercase);
Use the v and ^ buttons to change the hierarchy of the keys;
| |
| |
| |
| |
The Tabfile name is displayed along with its attributes.
| |
| |
| |
The tabfile and table names are displayed.
Enter the new Index Name.
Check Unique Index if only one instance of the selected keys is
allowed in this index.
Enter a Percent Free for this index. This is between 0 and 99 and
indicates how much free space is left in each index block. Use small numbers for stable, read only tables and larger numbers (e.g. 50) for dynamic tables.
See the CREATE INDEX command.
| |
Enter the Tabfile Name and, optionally the Filename. If you don't specify a filename, it is set to the tabfile name with extension .tbf in the default directory. Use the "[>>]" button to find a file using the operating system file browser.
See the CONNECT TABFILE command.
| |
The Tabfile name is displayed.
Enter the new Table name.
A list of the currently defined Columns is given.
| |
Enter the Tabfile Name and, optionally the Filename. If you don't specify a filename, the tabfile name with extension .tbf in the default directory is used. Use the "[>>]" button to find a file using the operating system file browser.
See the VERIFY TABFILE command.
| |
| |
For example, the attribute for the first file in the first database is always SIR011. This is mapped to the
specific operating system file such as C:\mydir\myproject\projdb.sr1.
Internal names may be specified by a program, may be the filename if it meets the specification of a SIR/XS name or
may be system generated such as SYSUSR1. Attributes are created automatically when you refer to a file
just using a long operating system filename, but you can also create and amended them specifically as necessary.
This then allows you to refer to that file using a standard SIR/XS name.
Checking Show System Values will include some internally generated file attributes in the list.
Select an attribute or file name from one of the lists.
Modify the name or value in the lower boxes then press Update or Add to set the new value.
If the selected file appears to be a text file then the Edit button will be enabled.
Press Open to open the file via an appropriate application.
Press Delete to remove the attribute link (this does not delete the file).
See globals.
| |
Buffers may be created by the menu system or by user programs. A list of the current buffers is displayed for selection on the left. The selected buffer's contents is shown on the right.
| |
sir.ini file in the user's My Documents directory in Windows, or the .sir file in the user's home directory in Unix.
To use a text editor that is already on your system, set the settings-preferences editor choice to External and enter (or browse for) the name and location of the executable editor you want SIR/XS to use. e.g.C:\WINNT\Notepad.exe. When you edit a member or a buffer, it is written to a temporary file for editing and, when you finish, it is copied back and the file is deleted.
The internal editor is a simple multi-line text graphical object. This is used in any dialogs and can be used directly if required. Set the settings-preferences editor choice to SIR. This editor works in a basic way as per normal text editing on your computer.
You can set the size of the internal editor dialog by changing the Height and Width (in dialog units) attributes on this dialog. This setting also effects the DBMS Command dialog.
CautionWhen SIR/XS uses an external editor, it writes the member or buffer to a temporary file and spawns the external editor as a process. When that process terminates the temporary file is checked to see if it has been modified and if so, the file is copied back to the original location. Problems occur when the spawned editor passes the file on to another process and ends itself. This can happen when the file is too big for the editor (Windows NOTEPAD starts WORDPAD if the file is too big) or if the editor is set to allow only one instance to run (in which case the file is opened as a document in an already running instance of the editor). If this happens, the buffer or member is not updated after editing.Make sure you use an external editor that can handle large files and that it is set to allow multiple instances to run. |
When a file or member contains suitably formatted code, it can be edited with the dialog or forms painter. You can get the painter to start automatically, never, or after a prompt when this type of file is open for editing.
>> button to locate the executable file that starts an HTML browser (e.g. Mosaic / Netscape / Internet Explorer...).In Windows this defaults to your default web browser.
xlsfonts lists available font names).
Check Remarks to show system remarks and messages;
See the
Exclude Database Variables defines a set of database variables to be excluded from the variable lists in the Procedures.
Press Remove to delete the association between the filename extension and external program.
New / View With enter a new or existing extension and use the
Preview Records set the number of records to be processed in preview mode.
Use Master If you are accessing the database through Master and you uncheck this box then Master is not used.
HTML Style points to a member that is used with HTML reports.
There are some members in the sysproc file with names like
Enter the name and port of the Master process and press
Press the
When Master is connected its name is shown in the SIR/XS main window title bar.
When Master is connected you can use this dialog to control the master process.
If master has been started with a password specification then this password must be entered correctly.
Master can be set to perform automatically a regular
The
A list of clients of the current master is displayed. The current session client is marked with a "*". The connection time and last transaction time of the selected client is displayed below the list. Press the
Press the
A list of active databases opened by the current master is displayed.
Press the
Press the
Press the
Press the
Remarks and commands, as well as several other output message types, can be switched on and off in the Preferences dialog.
They can also be controlled using the PRINT BACK DBMS commands
Select "Create a new database" to start defining a new database.
Select "Open new database" to connect to selected databases in the list below. You are prompted for any passwords. If More... is selected then the file browser allows you to search for databases files.
Check the "Don't show this anymore" to prevent this dialog being displayed every time you start SIR/XS. It can be displayed again by checking "Display Novice Welcome" in the startup section in the Preferences dialog.
Output
These settings apply to this session only. The Page size, Error/Warning limits and Print back settings can be saved as defaults for future sessions.
Default Directory
Sets the default directory.
Output File
Sets a Filename to write output to. A blank filename (or the name CONSOL) directs output to the session window.
Use the "[>>]" button to find a file using the operating system file browser.
Page Size
Sets the size of output file in character rows and columns. The number of rows applies to file output only and sets the number of lines on a page.
Error Warning Limit
Sets the limit on the number of error and warning messages displayed during the processing of input commands. Once the limit has been reached, processing continues but the messages are suppressed.Print Back
Sets what types of messages are displayed or printed to the current output.
Print back options control the text written to the output file or output window.
Check Commands to echo top level commands;
Check Called to echo commands generated from the CALL command;
Check Do Repeat to echo commands generated by DO REPEAT blocks;
Check Skipped to display commands not processed due to CIF (Compile IF) commands;
Check Attributes to display information as a file is initially referenced;
Check Task Stats to display process information after a task completes .PRINT BACK command.
See the SET command.
Procedure Settings
sir.ini file in the user's My Documents directory in Windows, or the .sir file in the user's home directory in Unix.
Sometimes database variables and records (and dummy CASES) are used for admin/audit and other purposes
not directly related to the study. You can exclude these variables from the pick lists
in the output procedures. Because these are related to a DATABASE rather than a user,
these are defined and stored in the database PROCFILE. The member SYSTEM.EASYPROF
or the member named by the GLOBAL "EASYPROF" is used. If the member does not exist all variables and cases are used.
The format of the file is:
CASE LIST = caseid_list
INCLUDE
 recname.varname
 recname.varname
 recname.varname
 ...
EXCLUDE
 recname.varname
 recname.varname
 recname.varname
 ...
Recname.varname can be a pattern (like rec@.va@me) in the EXCLUDE list.
Extension / View With Shows the external programs used to view the output of the procedure.>> button to locate the executable file associated with this extension.
Press Add to update the list with the new details.EASY.RSTYLEx. you can enter one of these
or create your own member based on one of these and use that.Server Settings
Set timeouts in tenths of a second for SirMaster and SirSQLserver.Master Settings
Controls concurrent database access through master.
A SirMaster must be running and have write access to a database to use concurrent database access.Connect. This name is shown when master is started, e.g.: SirMaster Started 09/27/05 11:31:18 on 'b2:3000' - the name is B2:3000).Disconnect button to access databases in single user mode. Single user mode is much faster than concurrent access but, if master is controlling the database for other users, you are only able to read and the data you retrieve is current to the point master last copied the data to disk.Difference File Copy. To set the update interval in minutes, enter a number and press the Reset Copy Interval button. A value of 0 specifies that the difference file copy is only done when all users stop using the database. This command requires a correct password.Copy Diff. File Now button does a difference file copy.Refresh button to update this list.Disconnect User button to disconnect a user from master. This requires a password. Normally allow users to disconnect themselves.Shutdown Nice button to initiate master shutdown. This requires a password. Each master user is sent a message and no new users are allowed to connect to this master. When all users have disconnected then master shuts down.Shutdown Now button to shut master down now. This requires a password. No warnings are given to users.Update Settings
Controls the automatic checking for software updates. By default, checking for all relevant updates is done monthly. This can be changed so that only critical updates are reported or not to check for updates at all.Check on Next Startup to force an update check.Go to Update Page check for an update directly through a web page. LIST REMARKS/LIST COMMANDS
These can be turned on or off to limit the amount of information displayed in the output as commands are processed. These are here for convenience. List Remarks, when on, means that various informative messages are displayed.
List Commands, when on, echoes all input commands to the output. SIR/XS HELP
The SIR/XS help is HTML based and can be viewed using any HTML browser. The preferred HTML browser can be chosen in user preferences. Welcome to SIR/XS
This dialog is displayed when SIR/XS is started without a database parameter and when the novice welcome indicator is on.
Novice Welcome